Resources
Learn More about KickAss presentations!
This is called Bloom’s Taxonomy. For most presentations we stay low on the mountain, which means that we want our audience to remember what we taught, understand it at a deeper level or perhaps even apply some of what they have learned.

Title: Is it necessary? We often confuse the “topic” of the slide with the takeaway message. Remember that this slide is for the audience, not for you. What do you want them to remember? Too many words: The audience will immediately start to read ahead, which means they won’t be listening to what you’re saying.
Keep it simple and sleek. The words we removed from the slide can be said by the presenter and kept in the slide notes. In many rooms, even small ones, audience members can have a difficult time seeing the bottom of the slide, so try to keep your takeaway message in the top half (or at least not right along the bottom). By having fewer words on the slide, you can make the font size larger and easier for your audience to see, like in the example below.
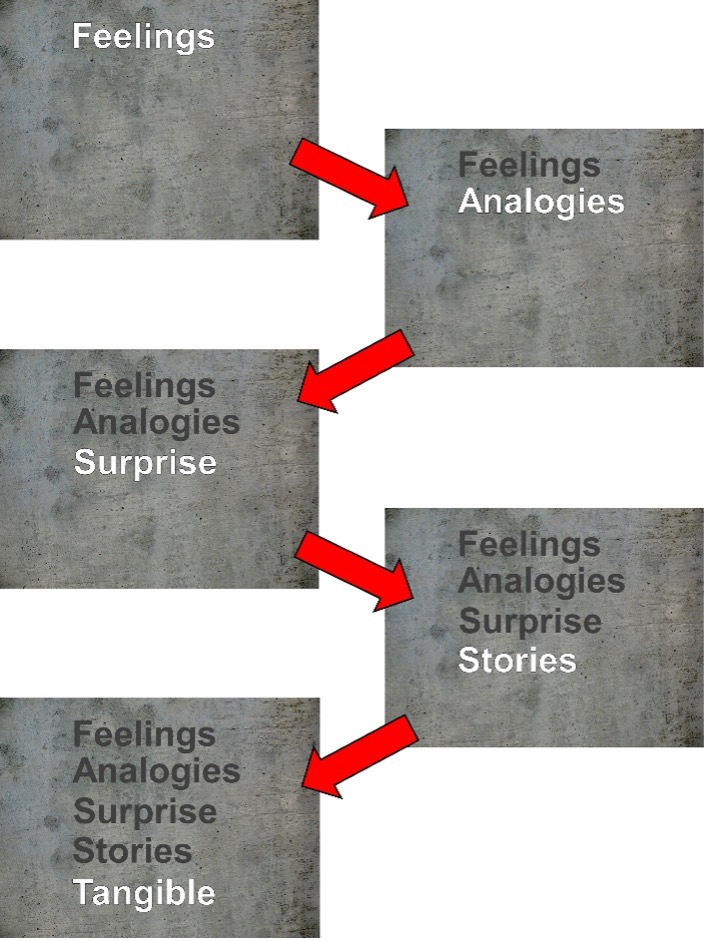
When you show an audience a slide with a full list on it, what do they do? They read ahead—which means they’re not listening to you. To control this, one technique is to have the points appear as you talk about them.
You can highlight the one you’re speaking about and have previous items blend more with the background. This allows the audience to keep up when taking notes and prevents them from reading ahead.
In this example, the list appears one item at a time over five slides. Start with your final slide and duplicate it once for each item on the screen. On the first slide, highlight your first point and delete the rest. In your second slide, highlight the second item, subdue the first item, and delete the rest.
Carry this on for slides three, four, and five. The effect, when displayed for the audience, is an animated list where their eyes are drawn to the highlighted item.
Build a Kickass Intro Slide
Put extra effort into your intro slide. Think of it like the cover of a book. The text should be easy to read, even from the back of the room. This will be up while people enter the room, and it sets the expectation for what’s about to happen. I can often predict how good a presentation is going to be based on the intro slide. If it’s bland and unimaginative … you get the picture. Here are a couple of examples of intro slides I’ve used over the years:


Check out this ad by the Surfrider Foundation. It’s so visceral. You can imagine biting into this and the feeling it would have in your mouth.

Slide Checklist
Now that you’ve built some slides you can go through each one and make sure that they meet some basic criteria:
1. The takeaway message is the focus of the slide. (One idea per slide.)
2. Your image is sharp and helps explain your idea.
3. Text is:
a. Limited—do you even need any?
b. Easy to see (in a large font, in colors that stand out, and in the upper half of the slide)
c. Not just the title—the text IS your message
Presentation Checklist
You’ve looked over your slides and are happy with them. Now it’s time to take a broader view of your presentation and slide deck.
1. You’ve memorized your purposeful opener.
2. Your identified objectives are met.
3. Your takeaway messages are clear.
4. You’ve used the FASST acronym (at least in part) to ensure that your ideas are sticky.
a. Feelings
b. Analogies
c. Surprise
d. Stories
e. Tangible
5. You’ve injected humor.
6. You’ve built in a review to cover your objectives (if appropriate).
7. Video and audio run smoothly.
8. You’ve memorized your purposeful close.
Equipment Checklist
1. Have your entire presentation ready to go on a flash drive in case your laptop crashes.
2. Have your laptop ready to go in case the venue’s computer crashes.
3. A presentation remote (with a back-up and extra batteries). A kickass presenter can’t be handcuffed to the computer. This is a small investment with a huge pay-off.
4. Any adapter cables you might need. For example: HDMI to VGA.
5. An extension cord and power bar are very handy.
6. A small, high-quality speaker can do a great job. Don’t rely entirely on the venue’s sound system.
7. If you need internet access, make sure you have a back-up plan, like turning your phone into a Wi-Fi hotspot.
8. Have your entire presentation printed out so that if all else fails, you can go without technology.
9. Props, handouts, games, extra dry-erase markers, and any other odds and sods.
Room Setup Checklist
1. Test your presentation—screen, projector, sound, video, and presentation remote. This always takes more time than you think it will.
2. Teaching aids—get the flip chart where you want it, have working white board markers in the right spot, and set any props where you need them.
3. Lighting—can the audience see you from everywhere in the room? You are the presentation, not what’s on the screen. Next, can they clearly see your screen from everywhere, especially at the back? Does the audience have enough light to be able to take notes?
4. Seating—this might be something you can’t change, like in an auditorium. If you’ve got a small class you can move the desks, chairs, and tables into the configuration you like. Maybe you’ll use a hollow square where you can easily interact with each audience member, or perhaps table groups that will be better for small group work.
5. Remove clutter and distractions—that flip chart with stuff from another class, the piles of paper and extra pens, even your own laptop bag and props. Tuck it all away so that the audience can focus on you.
6. Check yourself—before you wreck yourself! Is your phone where you want it and is it on silent?